Unit 26 - Branded App
Overview
Welcome to the world of events management. webMOBI has come up with Branded mobile Apps with a comprehensive solution for managing events. We offer a complete All in one event management solution, which makes it easy to get the most out of your events. Showcase your Brand, build communities, increase audience engagement, and drive excellent ROI's.
Event type:
Public Event:
1. User can download the application from the App Store or Play Store
2.Users can register using the Sign Up option or connect with facebook and LinkedIn option.
3.Even Though the user is not registered or logged in he can access the application but he will not able to see the attendee list and Add On features.
4.Organizers can add the attendees and send the email regarding registration by selecting the send email option given to the organizers while adding attendees.
5.Users will receive the password to their registered email address using which they can log in to the application else user can register using Sign Up option as mentioned above
Private Event:
If the event is private, only registered users can see the event app. The admin or event manager will set the password for the event as shown below.

In settings page under add layout admin can set the password or private key.

To view private event users must be logged in with the registered email and private key as password which is shared by admin.
Views:
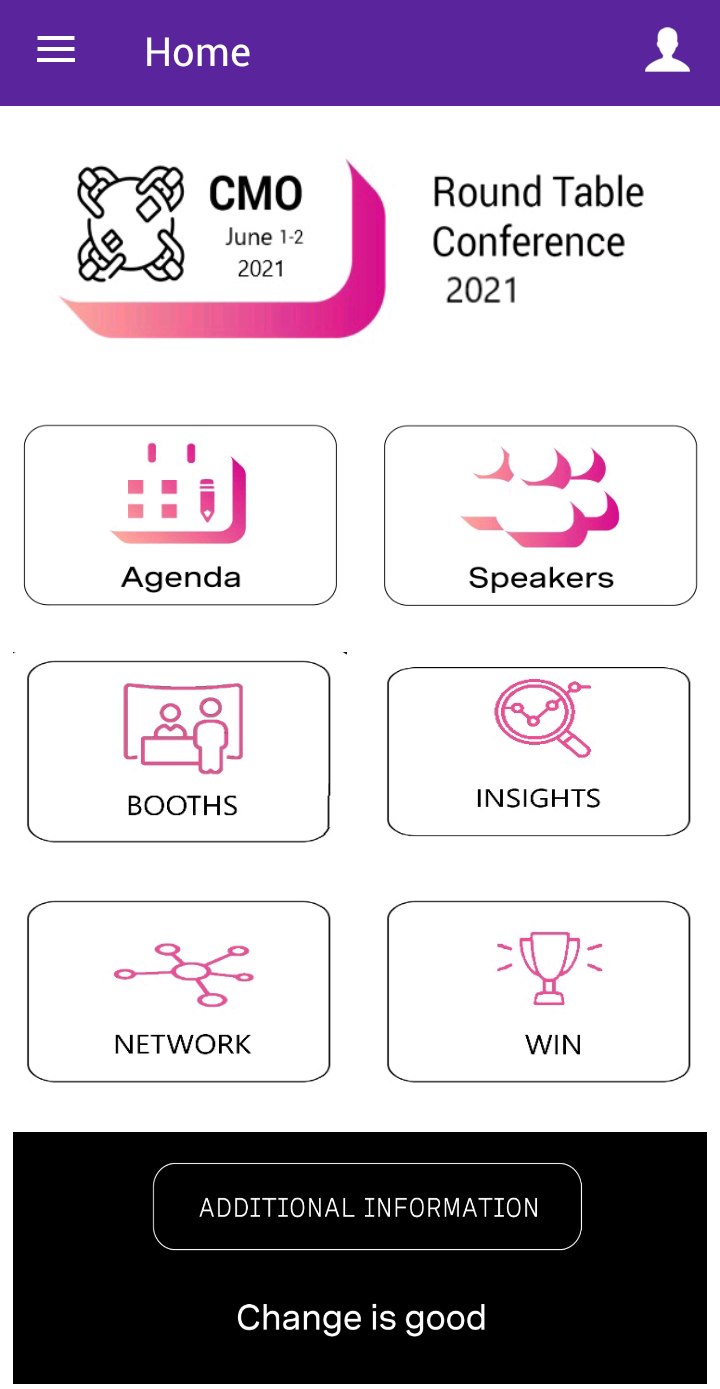
Home Page
The Home Page of the App displays some details like Venue, Agenda, Exhibitors, Contact Us, About, and Countdown watch. Here you can choose to want you to want to display on the home screen. Users can log in by clicking on the Login option at the top right-hand corner.

webMOBI Multi-event mobile app layout
Left Panel
This section contains generic features :
- Interactive Agenda
- Speakers, Exhibitors, and Attendees
- Documents
- Maps and navigation
- Videos
- Survey
- Activity Feeds
- Social Media
- Twitter Hashtag
- Gamification
- Sponsor commercial/advertising
- Helpdesk
- About Us

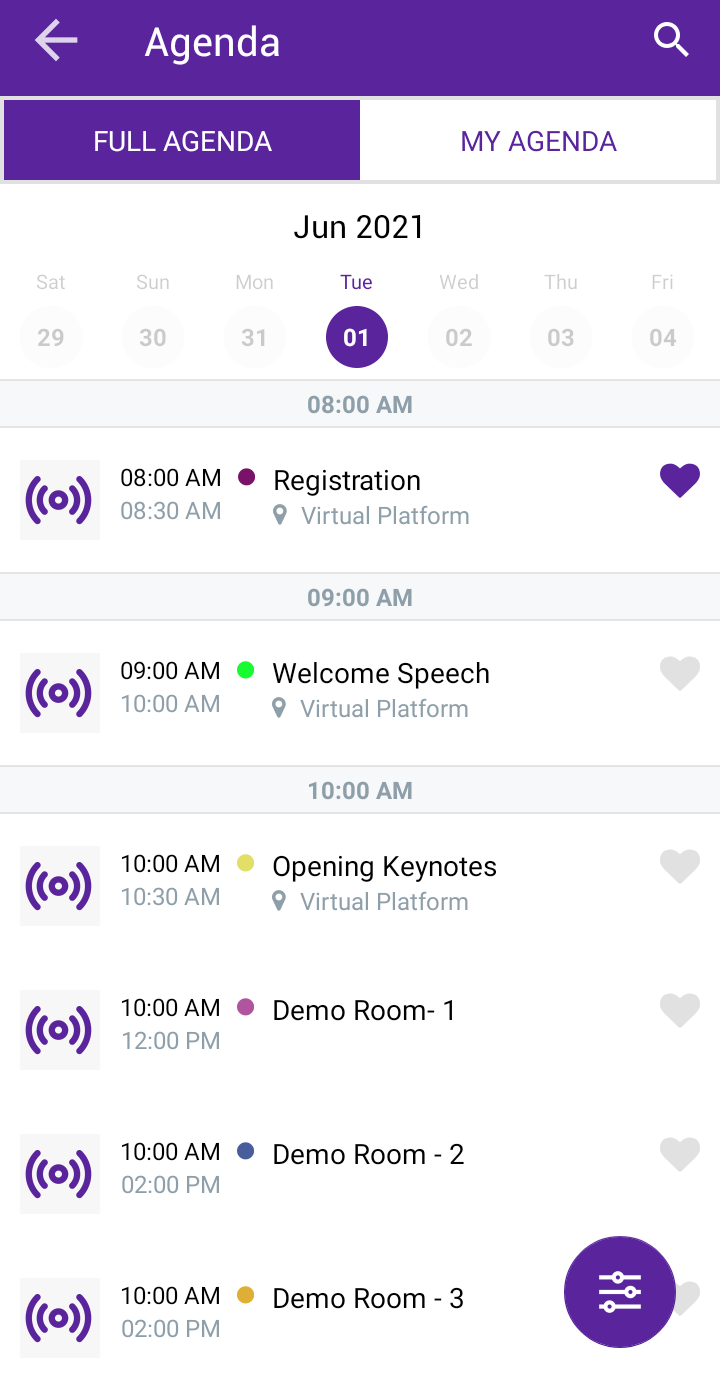
- Interactive Agenda:
The attendees will be able to see the entire program of the event, which includes multiple sessions taking place, with corresponding timing, venue details, speakers, presentation details and much more information about each session. - Speakers, Exhibitors, and Attendees
The Speakers, Exhibitors, and Attendees modules contain lists of all the participants who are involved in the event. The users can browse through and know about the speakers, exhibitors, and fellow attendees. This will help to build a network and engage with speakers and exhibitors including handouts and presentation information. For attendees, there is also opt-in and opt-out functionality where if the user does not want to be listed in the attendee directory, they can opt-out. - Documents
The event organizer can share important documents, session content, and handouts in PDF format. - Maps and Navigation
The event attendees can provide detailed maps of the site, to help users navigate the exhibitor booths as well as conference rooms. The Google Map enables event navigation as well as searching for the venue. - Videos
The Videos modules allow the attendees to see your event-related videos right on the app - Survey & Live Poll
The survey and live Poll module encourage the audience to participate in a survey and give feedback. The event organizer can gather audience satisfaction data to make your event more successful. One can run Live Poll and show results in real-time to engage attendees - Activity Feed
This facebook like social networking feature enables the attendees to boost attendees’ engagement where they can engage in live discussions, ask questions, share photos, likes, and comments on other attendees’ post. - Social Media
The App supports integration with all major social media channels like Facebook, Twitter, LinkedIn, Instagram, and more. The users can browse your social media profiles without leaving your app. - Gamification
Everyone enjoys games, implementing gamification in the event app certainly increases interaction between attendees, presenters, guests. You can define the rules and enable engagement for each event. - Sponsor
The sponsor's logo and name will be visible in the app. The Sponsors can be categorized with different categories. - Helpdesk
The attendees can contact the event organizer via the contact and get to know about the event organizer contact information. The attendees can easily reach out to the event organizer and interact via this module. - About Us
This module is an HTML page that enables you to have any HTML content with a WYSIWYG editor.
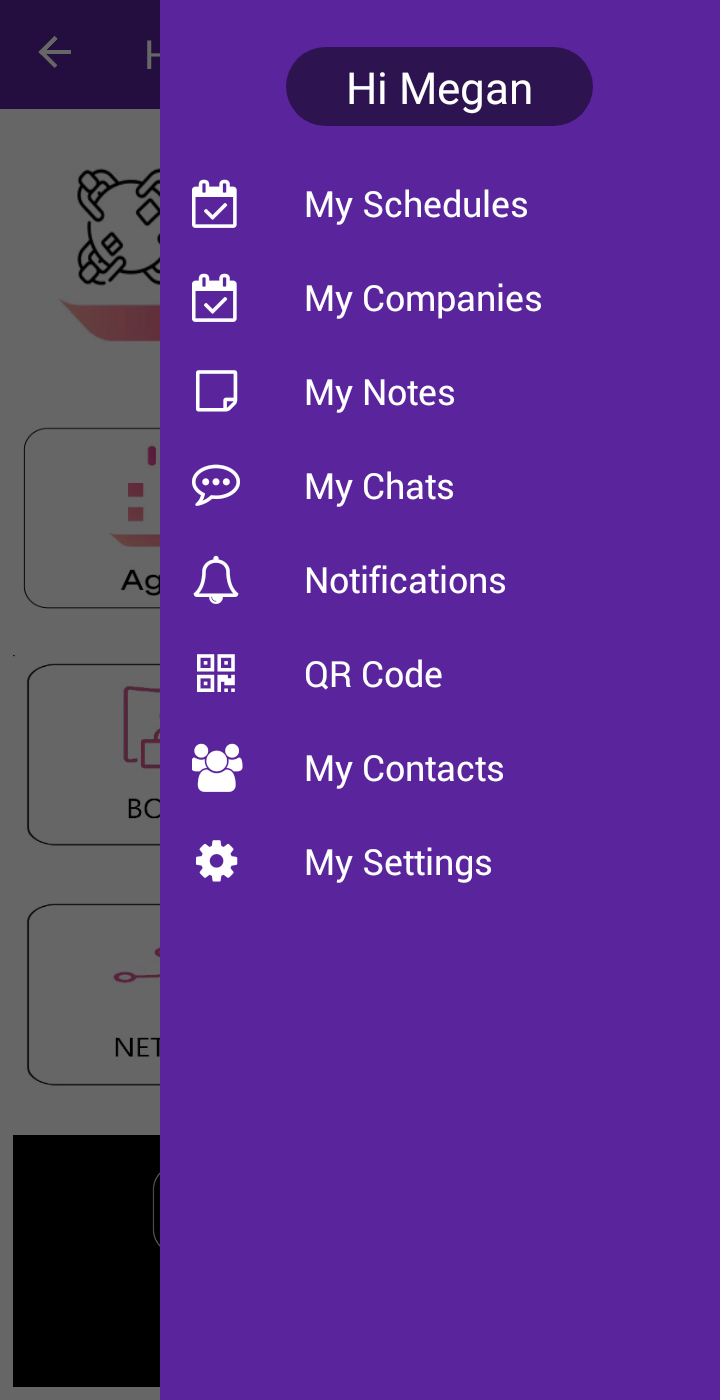
Right Panel
This section contains attendee specific modules like:
- Admin Panel
- My Schedule
- My Companies
- My Notes
- My Chats
- Notifications
- Inbox
- My Contacts
- My Meeting
- QR Code

- Admin Panel:
This feature is available only for admin. The admin can check in the attendees by scanning the QR code. The event organizer can also do on the spot registration from the check-in feature. With the notification, the admin can send push notification to all the registered users. In the Reports section, Exhibitors will get the list of lead generated (Lead generation feature is available for Exhibitors). - My Schedule:
The users can add any session from the Event Agenda they like to their Personalised Schedule. It will remind them if they try to have more than one engagement at the same time. The sessions in My Schedule will be exported and will show up on the local calendar of the device. - MY Meetings
The Attendees can find a mutually available time and set up a meeting. All the accepted Meetings will be shown in this list. - My Chats:
The Attendees can connect and chat with each other with our Attendee’s Messaging Feature. This list shows all your chats - Notifications:
The Admin can send reminders, updates and survey links to all attendees or specific groups right from the mobile, as well as from the dashboard which will be shown in this feature. - Inbox:
All the Meeting requests will be shown in the Inbox. The Attendee can accept the meeting or decline the meeting depending on his priority. - My Contacts:
Here you can able to perform the Attendee information exchange between two attendees by scanning their respective QR Codes and Chat as well. - My Notes:
An attendee can take notes in any session. Click on Agenda and select a particular session then on Add notes to take notes for that session. All the notes will be displayed in My Notes section - QR code Scanner:
This Features can be used by the admin for Attendees check-in and by the exhibitors for collecting leads. - My Companies:
The Companies which you marked as a favorite from both the exhibitors and sponsors will be displayed here.
Features:
Push Notifications:
Login to Dashboard and open your event which you want to send the Event Notifications.
Click on Push Notification module.
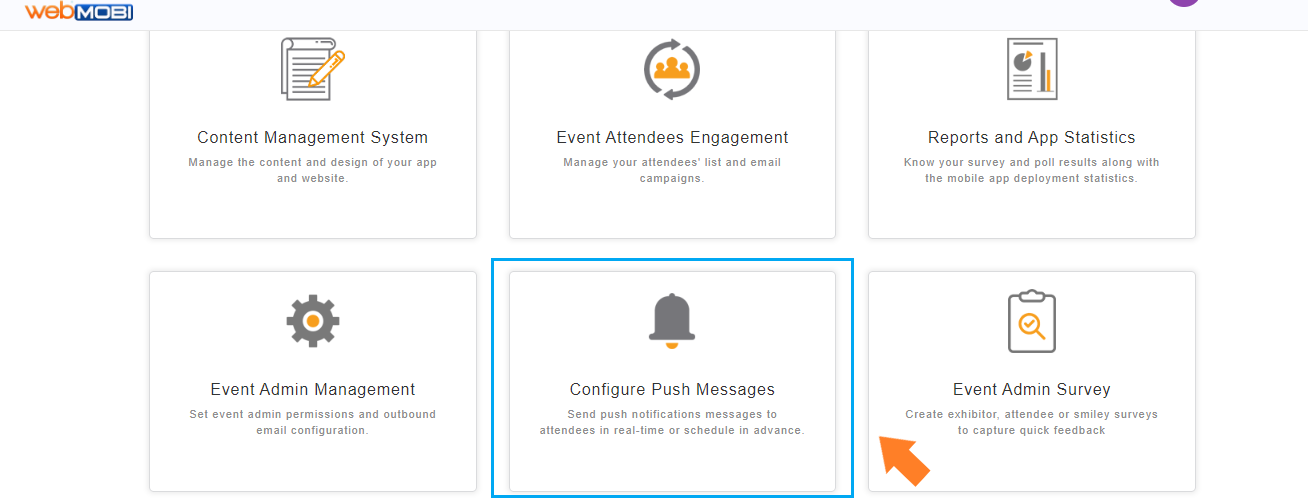
Type the Message title and message. And Admin have the possibility to send over the notifications instant or Scheduled.

Select the Message type that you want to send for different platforms.
Broadcast: Notification will go to all the mobile users for android and iOS as well.

One Device: Notification will go the mobile which you are selecting either android or iOS.
Once the notifications sent successfully, admin have the option to check out the notification list that sent.
Click on the Notifications to check out the list of notifications.
Here you are, so the attendees will start to get the notifications once he install the event app on their mobile devices.
Login to Dashboard and open your event which you want to send the Event Notifications.
Click on Push Notification module.
Type the Message title and message. And Admin have the possibility to send over the notifications instant or Scheduled.
Select the Message type that you want to send for different platforms.
Broadcast: Notification will go to all the mobile users for android and iOS as well.
One Device: Notification will go the mobile which you are selecting either android or iOS.
Once the notifications sent successfully, admin have the option to check out the notification list that sent.
Click on the Notifications to check out the list of notifications.
Here you are, so the attendees will start to get the notifications once he install the event app on their mobile devices.
Exhibitor/Sponsor Check-in Process:
- Login as Exhibitor/Sponsor into the mobile app.
- Tap on the Right Panel of the mobile app and select the Generate Leads.
- Scan QR code of the Attendee to generate Leads.
- Tap on the Report to check the generated leads.
- Login as Exhibitor/Sponsor into the mobile app.
- Tap on the Right Panel of the mobile app and select the Generate Leads.
- Scan QR code of the Attendee to generate Leads.
- Tap on the Report to check the generated leads.
Attendees Contact Exchange Process:
Login into the application.
Tap on the Right Panel of the mobile app and Select the My Contacts.

Tap on Scan QR Code [To fetch Attendee details through QR Code]

Choose any attendee badge to fetch the details.

Scan QR Code to fetch the Attendee Details.

Now, you can find the scanned attendee details in the My Contacts module in mobile apps.
Login into the application.
Tap on the Right Panel of the mobile app and Select the My Contacts.
Tap on Scan QR Code [To fetch Attendee details through QR Code]
Choose any attendee badge to fetch the details.
Scan QR Code to fetch the Attendee Details.
Now, you can find the scanned attendee details in the My Contacts module in mobile apps.
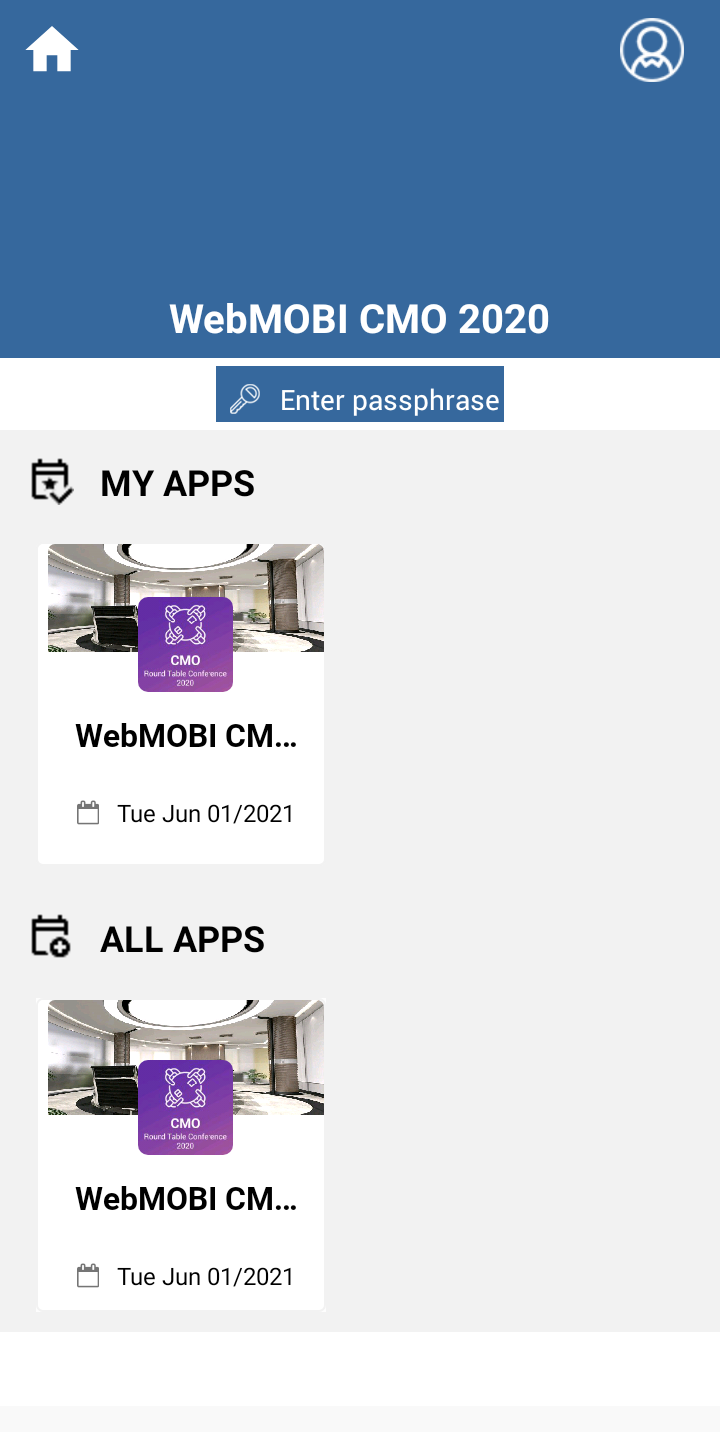
webMOBI virtual Event Platform
- Download the webMOBI app from the play store and app store.
- Join using your registered email ID and the passcode which you’ll receive in your email.
- Click on the webMOBI CMO 2020 icon from the MY APPS Section.
- Find the list of modules in the left panel.
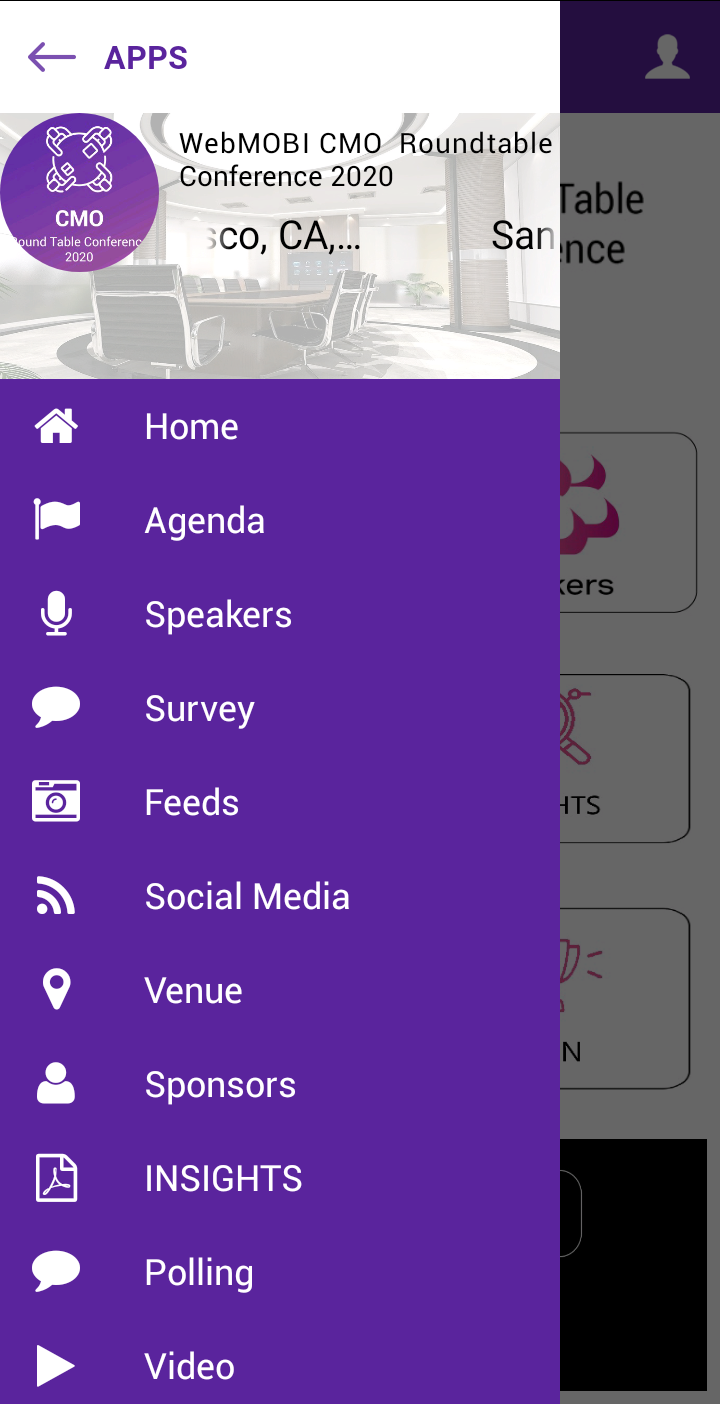
- Highlighted features and modules in the homepanel.
- And personalized features in the right panel.
- To Join the session from the app, choose agenda option.

- Choose the session that you want to join and click on the stream icon to join the live stream.
- Download the webMOBI app from the play store and app store.
- Join using your registered email ID and the passcode which you’ll receive in your email.
- Click on the webMOBI CMO 2020 icon from the MY APPS Section.
- Find the list of modules in the left panel.
- Highlighted features and modules in the homepanel.
- And personalized features in the right panel.
- To Join the session from the app, choose agenda option.
- Choose the session that you want to join and click on the stream icon to join the live stream.
Related Articles
Unit 2 - webMOBI platform description
What is webMOBI? webMOBI is a new generation AI-powered all-in-one event management software and provides a suite of engagement tools for enterprises. webMOBI delivers a suite of event management software tools that includes event apps, website, ...webMOBI branded app access and dashboard credentials
This knowledge article describes the process to download customer branded mobile app. To download click on the link below or scan the QR code. Mobile App links and QR Code Android- ...webMOBI branded Tech Conference application information
Download the branded app Play store and App store links and log in with the credentials below. Refer to the portfolio document to see the detailed feature list for the mobile application. Android: ...Unit 25 - Container App
Overview webMOBI Mobile Container App is a perfect blend of power and design. ● Download the webMOBI app from the Play Store or App Store ● User can also connect using Facebook, Linkedin or using the email On the container App home screen, you will ...Unit 13 - About Us
Unit 13 - About Us Click on the “About Us” option from the left panel of the home screen admin dashboard if available or else click on "Add features to your event" to add the About Us module to the left panel. Now enter the information which you want ...